Kenmore 911.41789 User Manual
Browse online or download User Manual for Convection ovens Kenmore 911.41789. Kenmore 911.41789 User Manual
- Page / 28
- Table of contents
- BOOKMARKS
Rated. / 5. Based on customer reviews
OWNER’S MANUAL
KGnmorG
SINGLE 30" ELECTRIC
CONVECTION SELF
CLEANING BUILT-IN
WALL OVEN
MODEL NO.
911. 41785
911. 41789
CAUTION:
Before using this oven,
read this manual and
foilow all its Safety Rules
and Operating
Instructions.
Safety Instructions
Operation
Care and Cleaning
Problem Solving
Sears, Roebuck and Co., Hoffman Estates, IL 60179 U.S.A.
229C4020P196-1 (SR-10405)
- SINGLE 30" ELECTRIC 1
- CONVECTION SELF 1
- CLEANING BUILT-IN 1
- WALL OVEN 1
- CAUTION: 1
- SELF-CLBANING 2
- CONVECTION OVEN 2
- IMPORTANT 3
- SAFETY INSTRUCTIONS 3
- IMPORTANT SAFETY 4
- INSTRUCTIONS 4
- TRADITIONAL 6
- OVEN mtf^CTIONS 6
- OTHER TOUCH PADS 6
- OPERATtON 7
- Convection Baking Tips 10
- OPERATION 11
- CHANGING 18
- THE SPEED OF THE 18
- UP Oft DOWN AftROW PADS 18
- CONVECTION CPNVENSION 18
- COOK AND NOLO 18
- CARE AND CLEANme 19
- . If you want to 20
- CARE AND CLEANING 21
- CARE AND CLEAHIHG 22
- BÈMOVABLÈ WÈN àoOR 23
- BEFORE CALLING FOR SERVICE 24
- BEFORE CAUm FOR SERVICE 25
- “DO IT YOURSELF” 26
- TEMPERATURE 26
- ADJUSTMENT 26
- WALL OVEN WARRANTY 27
- 1-800-4-MY>HOME" 28
- 1-800-366-PART 28
- 1-800-488-1222 28
- 1-800-827-6655 28
Summary of Contents
Page 1 - CAUTION:
OWNER’S MANUALKGnmorGSINGLE 30" ELECTRIC CONVECTION SELFCLEANING BUILT-IN WALL OVENMODEL NO. 911. 41785 911. 41789CAUTION:Before using this ov
Page 2 - CONVECTION OVEN
iJiiTtlOPERAWHConvection Baking Tips CONVeCTfON BAKfNGConvection Baking uses heated air that is circulated over and around foods by the c
Page 3 - SAFETY INSTRUCTIONS
aujOPERATIONConvection Roasting TipsCONVECTION ROASnNODuring Convection Roasting, heat comes from the top element. The convection fan circulates the h
Page 4 - INSTRUCTIONS
UJJ^OPERATIONOven Cooking TipsSTRONGIt is normal to have some odor when using your oven lor the first time. To heip eiiminate this odor, ventilate the
Page 5
amOPERATIONOven Cooking TipsMargarine (cent.)spreads affects the texture and flavor of favorite baked recipes. The lorwer the fat content of a spread
Page 6 - OTHER TOUCH PADS
OPERATIONConvection Baking and RoastingHOW TO SET CONVECTION BANEORNCèSfCONVECTIONCOOKING1. Press the Convection Cooking BAKE or ROAST pad2. Press t
Page 7 - OPERATtON
tUMOPERATIONBakingHOWTÒSETBÀKE ,(bak^1. Press the BAKE pad.®2. Press the TEMP UPand/or DOWN arrowTEMPpads to set the oven®temperature you prefer to us
Page 8
OPERATIONBroilingBroiling is cooking by direct heat from the upper element. The oven door should remain open to the broil stop position during broilin
Page 9
UULLiOPERATIONSetting Special FeaturesYour new touch pad control has additional features that you may choose to use. After making your selection, if y
Page 10 - Convection Baking Tips
OPERAWHSetting Special FeaturesYour control will allow you to lock the touch pads so they cannot be activated when pressed. If you're worried abo
Page 11 - OPERATION
OJJJSelf-Cleaning Cycle2.PREPARING YOUR OVEN FOR A SELF-CLEAN CYCLERemove the broiler pan and grid, oven racks, utensils and any foil that may be in t
Page 12
SAFSTY Ìpl9Tfì^QTtQNSTable of Contents€SOven Safety...3-4Features of Your Oven...5Removal of Packag
Page 13
LLUÀCARE AND CLEANINGSelf‘Cleaning CycleIrO$ETACt.£ANPYCLeThe Clean Cycle, including cool down time, is automatically set for 4 hours, but you may cha
Page 14
ìfiÉMOVÀBLB PLOOfiCARE AND CLEANING Removable PartsCONTROL PMÈLCLEANING MATERIALS• Dishwashing detergent• Warm water• Soft clothDo not use abrasive
Page 15
U_UUCARE AND CLEAHIHG Removable PartsREPLACING THE OVEN MGHT BUL&CAUTION: Disconnect electrical power to the oven at the main circuit breaker or f
Page 16
tunBÈMOVABLÈ WÈN àoORCARE AND CLEANING Removable PartsREMOVABLE OVENRACkSCLEANING MATERIALS• Dishwashing detergent• Warm water• Scouring pad or soa
Page 17
BEFORE CALLING FOR SERVICETo save you time and money, before making a service call check the list belovir for any problem you may feel you have wilh t
Page 18 - COOK AND NOLO
ti urtiBEFORE CAUm FOR SERVICEPROBLEMPOSSIBLE CAUSEPOSSIBLE SOLUTIONOven smokes. a. Dirty oven.a. Check for heavy spillover.b. Improper use ofb. Use o
Page 19 - CARE AND CLEANme
TO MAKE -RiE ADJUSTMENT“DO IT YOURSELF” TEMPERATUREADJUSTMENTYou may feel that your new oven cooks differentiy than the oven it replaced. We recomme
Page 20 - . If you want to
BUÍLPINWALL OVEN WARRANTYFULL ONE YEAR WARRANTY ON ALL PARTSII, within one year from the date o1 installation, any part fails to function properly due
Page 21 - CARE AND CLEANING
For itt-home major brami repair service:Call 24 hours a day, 7 days a week1-800-4-MY>HOME"(1-800-469-4663)Para pedir servicio de reparación a
Page 22 - CARE AND CLEAHIHG
amIMPORTANT SAFETY INSTRUCTIONSSAVE THESE INSTRUCTIONSRead all instructions before using this appliance. When using gas or electrical appli
Page 23 - BÈMOVABLÈ WÈN àoOR
ittmiIMPORTANT SAFETY INSTRUCTIONS• DO NOT touch heating elements, surfaces near them, or interior oven surfaces. These may be hot enough to cause bu
Page 24 - BEFORE CALLING FOR SERVICE
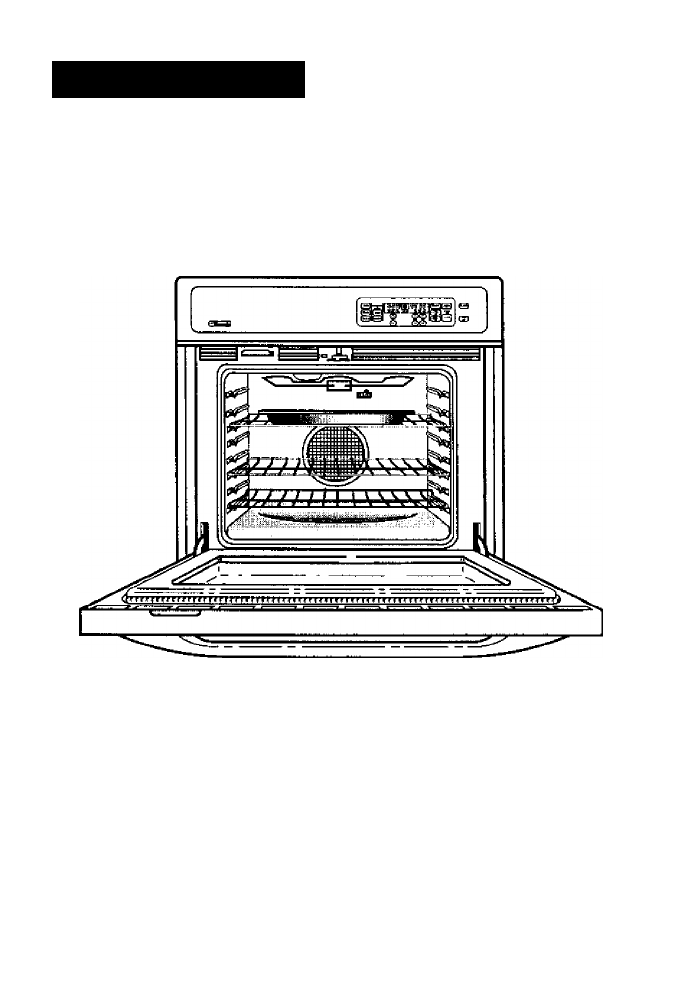
OPERATIONFEATURES OF YOUR OVENSelf-Clean Autometfc Door LatchOven VentOvenTemperature SensorConvection FanOven ControlSelf-Cleaning Oven InteriorModel
Page 25 - BEFORE CAUm FOR SERVICE
aulОРЕВАШНOven Control, Clock anú TimerYour new touch pad oven control will allow you to set oven functions with ease. Below are the different ty
Page 26 - ADJUSTMENT
MilitaOven temperature indicatorControl DisplayIndicator to let you know the oven has turned onOPERATtONFlashing Indicator to alert you to set
Page 27 - WALL OVEN WARRANTY
UUiOPERATIONClock and TimerC(.QQKThe clock must be set for the correct time of day before a delayed oven function can work properly. The time of day c
Page 28 - 1-800-827-6655
LLLLOPERATIONOven Control, Clock and TimerTONESYour new control has a series of tones that will sound at different times. These tones may sound while
© 2020, manymanuals.com. All rights reserved. | 4.572 s |
 Manymanuals.com
 Manymanuals.de
 Manymanuals.fr
 Manymanuals.it
 Manymanuals.pl
 Manymanuals.cz
 Manymanuals.es
 Manymanuals-pt.com
Comments to this Manuals